DISCLAIMER: This guide is based off of what was written for my v0.49.1 guide and my experiences while playing through this version. Any similarities to the guide written for the guide written by Taifun Riders that was exclusively available for patrons are purely coincidental.
Table of Contents
- Intro [a]
- Early Game and Info [b]
- Medieval Planet [c]
- Roselyn Route [c1]
- Desert Planet [d]
- Nebet Route [d1]
- Jungle Planet [e]
- Past Route [f]
- Easter Eggs [g]
- Erin the Witch Apprentice [g1]
- Ginny the Genie [g2]
- The Cheat Code [g3]
- Last Words [h]
Intro [a]
Space Paws is an adult dating sim currently in progress by Taifun Riders, which you can download the newest available public version at their website. If you want to play it online instead and not have the risk of having your stash found by someone, you can find it on wetpussygames, comdot, or gamcore. It will also be available on gamesofdesire in the near future. But either way, I suggest supporting them on their Patreon. I am not affiliated with them at all; I'm just a fan that enjoys this game.
Space Paws is a fairly straightforward game, but some things can be difficult in the game, especially when you have a raging boner that is potentially causing your decision making skills to drop. Taifun Riders also has a walkthough for this version, but as of the when this guide is being written, it is not available to the public. You can find this information scattered through the internet; I gathered this information through sources such as Newgrounds and YouTube comments, testing them by playing the game myself. You could always ask Taifun Riders themselves on the website or on the forums that they participate in, but from what I've seen, they are more inclined to give hints rather than the answers straight up, and I understand that. It feels great to solve something on your own. On the flipside, working on something you just can't solve for a long time can be frustrating, especially considering the strict requirements of the Easter Eggs.
A new publicly available version of Space Paws is up! This is still mostly the same game, so a large part of this guide will be the same as that of my previous guide. But there definitely are notable changes, so this will still be as comprehensive of a guide as possible.
You can find the changelog written by the developers here.
Although I personally don't care much about spoilers, I'll try to make this as spoiler-free as I can, so let's get into this.
Early Game and Info [b]
Okay, start the game. Enter your name when it prompts you to remember it. After some text, you now have 50 days of free time, but it doesn't count day 50. End Day 49 and you get Demo Ending 3, but you shouldn't get to that point; there's more than enough time (even more now that it's increased from the 40 days you had in the previous version). Now let's take a look at everything that you have that'll help you through the game: The menu, the spaceship icon, and the blue box. As a tip, if you press the tab button on your keyboard, you can toggle through everything on the screen that is clickable. This may be helpful if you're having trouble finding the easter eggs.
The menu on the top right of the screen has three options: Home, Save, and Exit. The home button takes you to the home menu and gives you an option to save before. The save button saves the game (duh) and you have six save files available to you. The Exit button closes the game and also gives you an option to save beforehand.
Clicking the spaceship icon at the top will take you to the main hallway of the spaceship from almost anywhere.
On the top left of the screen, you have a blue box that shows what day you are on, how much energy you have left for the day, and a button to check the rest of your stats. You start with 100 energy every day that you wake up in your room. Almost everything you can do uses up energy, including talking to people, so you'll need to manage your time properly...or you would need to theoretically in the complete version. This game in its current state can be finished in half of the time limit if you do everything properly and depending on which route you go on. I won't tell you what to do with your free time, but I will tell you any requirements that require you to have done something in your free time to progress, such as stat checks (more on that later).
**If you want to have the Easter Eggs available in your first playthough, you'll have to do some specific things that you might not do or be able to do, so go to that section now [g] if you don't want to miss them**
Now let's check your stats with the green button in the blue box. Here you can see more detailed information on your progress through the game as well. You can also see your items and relationship with the four heroines currently available, but that's mostly just for show. Anyway, back to your stats. They essentially don't do anything other than get you past the various stat checks throughout the game. What I mean by this is that certain options that you have are blocked off unless you have enough of a particular stat. This may lock you out of H-scenes, so pay attention. You can train your stats in the spaceship.
Go to the main hallway. In the left bottom-most room, you have your room. Here you can advance the day (thus refilling your energy) as well as train your Charm (mirror; 30 energy) and Strength (weights; 50 energy). I urge you not to end your day when you have energy unless you have nothing else to do on any planet.
In the left middle room is the library. Here, you can train your Knowledge (bookshelf; 40 energy). Now let's talk about training your stats.
When you select one of the training tools, you're given an option between regular training and doing your best. Doing your best takes you to a minigame that requires you to traverse a maze with your mouse to collect stat points (8 max) without the mouse touching any of the walls. Regular training skips the minigame at the cost of not giving as many points (just 3). The mazes are all fairly easy, especially if you play the game in full-screen, so I don't recommend ever doing regular training.
That's about it for what you can do with your free time. Let's get onto the planets. You can access them from the cockpit by clicking on the control panel at the front. The blueish planet leads to what will be referred to here as the Medieval Planet, the brownish planet leads to the Desert Planet, and the greenish one leads to the Jungle Planet. **Two of the routes require you to visit the medieval planet; there will be a point of no return later on. I will tell you when that happens. The game also warns you, but it is possible that the message arrives too late.** You can skip around the planets to do all the things you can on both planets that don't have stat checks to make efficient use of your limited energy. As the Jungle Planet is unfinished, for now, let's just see what we can do on the medieval planet.
Medieval Planet [c]
[Final Stat Requirements for the Common Route]
Strength: 20+ (if Knowledge is 25+) or 40+ (if Knowledge is 24-)
Knowledge: 14+ (if Strength is 40+) or 25+ (if Strength is 39-)
Charm: 5+
LANDING SITE
Nothing of interest here other than the ship; just head into the
MARKETPLACE
Here you can interact with three people, two of them being required for all routes. Talking to anyone costs 10 energy, so I'm not going to put that for everyone
- Merchant [Required]: He gives you five riddles for the ball that he's selling because you don't have enough money [14+ Knowledge needed]. Answer one wrong and you'll have to talk to him again (wasting 10 energy from the first encounter and the second). Solve the riddles yourself if you want, but here are the answers; he gives an explanation after each correct answer if you want to know why it was the correct one:
- A Stick?
- d
- What?
- Your mother!
- Tomorrow
- Max [Required]: He'll give you info on where you can go to complete your mission.
- Girl in red: Just talk to her once before Day 13 to set the flag for the easter egg on Day 13.
Stat Check: [20+ Strength needed past this point]
CASTLE ENTRANCE
After you've obtained the ball and talked to Max, try going into the castle and click on the guard. Select the option with the hand holding a ball icon. This won't require energy and will get the guard out of the way. Now you can enter the
CASTLE GARDEN
Here you will find Amber, counselor to the queen. Talk to her (which in this first encounter only for some reason costs 20 energy instead of the standard 10, but you can still talk to her with 10 energy) and she'll tell you that you'll need a recommendation to show that you're not a threat. Luckily enough, Max is someone of influence, so talk to him again and he'll give you a recommendation if you babysit his kids for one night. Accept it and the game will move you forward one day but will not refill your energy. Alison will also now appear in the Library on the ship for you to talk to, but there's nothing else to do with her for now. You can now have an audience with the queen. Head to the garden and talk to Amber again in order to access the
THRONE ROOM
Sitting in the middle is the queen, Roselyn and if you click on her, you will see five options. This along with the relationship box that appears below the blue box, shows that Roselyn is one of the datable heroines in this game. Talk to her and she'll ask you to find a bracelet.
Stat Check: [25+ Knowledge or 40+ Strength needed past this point, 25+ Knowledge recommended]
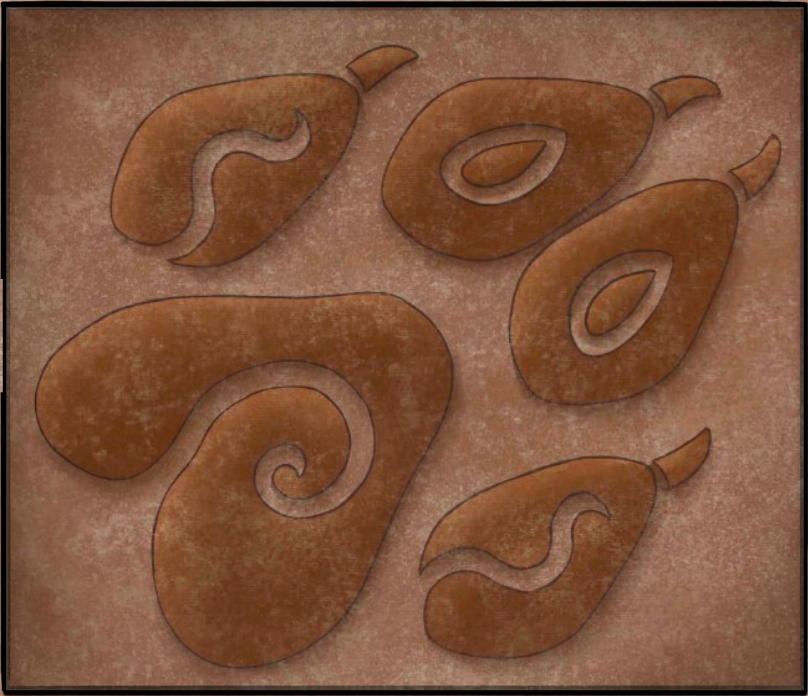
Head back to the marketplace and talk to Max. He'll take you to the cave where the bracelet is where there's a big rock that you need to move. Move it and head into the cave. Here you'll find the pieces to a puzzle that you have to do. It'll show you a glimpse at the beginning, but if you have 25+ Knowledge, you can click the hint button to show it again. If you went against my recommendation and moved the rock with strength instead, you could always try every piece on every square to see when they auto-click into place, but this is a guide, so you don't need to do that. Here's what the hint button will show you:
 Complete the puzzle and you get a key to open the chest that contains the bracelet. Before you give it to Roselyn, **this is the item that splits the routes on the Medieval Planet and the Desert Planet as well as affects what you can do on the fourth route; it's impossible to get another through normal gameplay.** Max advises you to save too; what a bro! Take his advice and save.
END OF COMMON ROUTE
END OF COMMON ROUTE
If you would like to continue onto Roselyn's route, go ahead to the next section [c1]. If you want to see the other option, go ahead to the Desert Planet section [d]. Alternatively, you can also go to the Jungle Planet [e], but the route on that planet has not been completed as of this update.
Roselyn Route [c1]
[Final Stat Requirements for the Roselyn Route]
Strength: 20+ (if Knowledge is 25+) or 40+ (if Knowledge is 24-)
Knowledge: 14+ (if Strength is 40+) or 25+ (if Strength is 39-)
Charm: 20+
To see all of the H-scenes:
Strength: 30+ (if Knowledge is 25+) or 40+ (if Knowledge is 24-)
Knowledge: 14+ (if Strength is 40+) or 25+ (if Strength is 39-)
Charm: 35+
Stat Check: [20+ Charm needed past this point]
Give Roselyn the bracelet (no energy needed, yay) and try to charm her. She'll agree to go out on dates with you which will require 80 energy (but will no longer deplete all of your energy like they did in v0.49.1). They'll all have stat checks that if pass you'll get an H-scene. Don't just skip text to the H-scenes, you'll need to know some specific information to finish the route. You'll have a choice of three places to go on a date:
- Lake [30+ Strength needed]
- Forest [30+ Charm needed]
- Snowy Mountains [35+ Charm needed]; starts new day and fully energizes you.
After any of the H-scenes, Roselyn's "Fuck Buddy" flag is set, which means that you can now head to Roselyn's final scene that requires 60 energy (but you might be able to trigger it with 50) You'll be quizzed on information that can be gathered from the three dates. Now if you just skipped to the H-scenes and wanna end the route, here are the answers to Roselyn's quiz:
- Loryns
- Manifus
- Oranges
- 912
- I went once
- Choose anything but "Indifferent"
H-scene happens (with a new foreplay cinematic!) and you get Demo Ending 1.
Desert Planet [d]
LANDING SITE
Unlike on the Medieval Planet, there is something of interest other than the ship here. There's a well! There's an easter egg that triggers here any day after Day 20 but not if the well is full of water. It's dry when you first arrive, but will fill up if you come close to finishing the route on this planet. I'll indicate when this will happen. It doesn't use up energy, but it only triggers once unlike the other easter egg.
CITY ENTRANCE
Here you'll see two guards. Talk to either one of them and you'll find that they won't let you in. What you need to do is get them closer and closer to fighting without giving them a chance to make up (you'll [need 30+ Knowledge] to access this hint). So pick these choices:
- (To Strong Cat) Oh! So...you, are the boss right?
- (To Skinny Cat) But is he always the one who speaks?
- (To Skinny Cat) I bet he's always the one who sees everything first...
- The sight is not the problem, dude. He instills more respect
- Hey! Wait! The most important thing is...Why is his weapon bigger than yours?
You can now access the
CITY SQUARE
CITY SQUARE
Here you'll find three people. Ignore the Flute Guy. Talk to both the Cat Mom and the Old Cat and Nebet will appear. Surprise, she's another heroine. Talk to her and she'll think you're a god and offer to take you to the Pharaoh.
Stat Check: [40+ Charm needed past this point]
Nebet takes you to the Pharaoh. The Pharaoh thinks you're a fraud (which you are) because you're not wearing the divine jewel with the blue scarab (sound familiar?), but your overwhelming Charm convinces him otherwise. Take note of what features Nebet says that makes you seem like a god; it'll be important later. After this you're back to the city square. Nebet will offer to take you to the temple, but you'll need 60 energy to do so.
An H-scene happens (and in that H-scene, you can click on the two other groups going at it to get a closer look) and you're found out to be a fraud. You offer to help by finding this divine jewel and Nebet will tell you that there will be a point of no return (again, it's possible that you've already given the jewel to Roselyn, making this warning a little too late). This is as far as you can go if you went to Roselyn's route; you can't get back the bracelet from her (and can't get another one through normal gameplay) and I'm confused as to why you're reading this. If you didn't go to Roselyn's route, go ahead to the next section.
Nebet Route [d1]
[Final Stat Requirements for the Nebet Route]
Strength: 20+ (if Knowledge is 25+) or 40+ (if Knowledge is 24-)
Knowledge: 14+ (if Strength is 40+ before moving the big rock) or 25+ (if Strength is 39-)
Charm: 40+
To see all of the H-scenes:
Strength: 40+
Knowledge: 14+ (if Strength is 40+ before moving the big rock) or 25+ (if Strength is 39- before moving the big rock)
Charm: 50+
Luckily, you've already found the divine jewel if you've been following this guide so leave the temple and immediately come back to give it to Nebet. She'll want you to meet with the Pharaoh again, this time costing 40 energy. You'll get the Pharaoh's blessing to goon dates see the planet with Nebet. Seeing the planet with Nebet requires 80 energy and you have a choice of three places to go to. Two of them have stat checks to access the H-scenes, but they're not required for the ending. Here they are, but make sure to pay attention to the information given on these dates.
Strength: 20+ (if Knowledge is 25+) or 40+ (if Knowledge is 24-)
Knowledge: 14+ (if Strength is 40+ before moving the big rock) or 25+ (if Strength is 39-)
Charm: 40+
To see all of the H-scenes:
Strength: 40+
Knowledge: 14+ (if Strength is 40+ before moving the big rock) or 25+ (if Strength is 39- before moving the big rock)
Charm: 50+
Luckily, you've already found the divine jewel if you've been following this guide so leave the temple and immediately come back to give it to Nebet. She'll want you to meet with the Pharaoh again, this time costing 40 energy. You'll get the Pharaoh's blessing to go
- Oasis [40+ Strength needed]
- The stat check here is so that you can start the minigame where you'll face off against a bandit. You'll both have three places that you can hit and be hit. Hit him where he isn't guarding during your turn and then guard against his attacks during his turn. If he looks like he's going to do a low punch in between the bottom two areas, guard the top area.
- Sets "Fuck Buddy" flag (just for show) and H-scene flag for the Canyon date if you complete the minigame
- Not needed for ending other than the information given
- Canyon
- Obtain the rope looking vine on the right side of the screen and end the investigation to set the rope flag for the Badlands date
- Badlands [50+ Charm needed]
- You'll get to see Nebet naked regardless of what you do
- Sets Nebet's "Close Friend" flag if you've set the rope flag **This will lock you out of the easter egg on this planet, so you might not want to do this before seeing it on or after Day 20**
- Sets "Fuck Buddy" flag if you get to the H-scene (it's just for show)
- Theoretically, you could just go to the Canyon, grab the rope and then head to the Badlands to get closer to Nebet's ending quicker. Maybe something for a speedrunner to do (do they even exist for these types of games?)
After you've set the "Close Friend" flag, redoing a date scene gets simplified to a choice of talking or having an H-scene (so you won't need 50+ Charm for the Badlands H-scene, 40+ Strength, or play the minigame for the Oasis H-scene if you do get here the quick way). You can also now get to Nebet's ending. It says it requires 60 energy, but in reality, it takes 60 energy. What's the difference? Since you can't have negative energy, you can choose the heart icon even at 10 energy. It won't work at 0 however. Anyway, she'll quiz you on information that you can gather throughout the dates. But if you just want the answers, here they are:
- There're 2. One hidden and one visible
- Your accent and suit
- There's one of the biggest rivers
- It's where the essence of life is
- Neftet
- To be with you
or
To bang you every day of my life
or
To know more about you
With that, Nebet's last H-scene happens and you get to Demo Ending 2.
Jungle Planet [e]
LANDING SITE
There's what appears to be a floating city here, but you can't get there right now. There's also the jungle, which requires 20 energy.
JUNGLE
You try to find your way and you hear cries for help. You find the source of the cries and it's a girl tied to a tree. Being a decent person, you don't try to rape her. But apparently she was trying to get "raped," so she's disappointed and shows you her chest when you explain why you didn't try to rape her. Anyway, she introduces herself as Siaren (and to no one's surprise, she's another heroine) and invites you to her base, which requires 40 energy.
BUNKER
Siaren introduces you to everyone there and you join FRY. Before Gunther will set you off on the mission, you'll need to either talk to Maya (choose the reticle icon; this will require 50 energy) and complete the minigame with 50 or more drones destroyed or talk to the twins (also choosing the reticle icon) to have them train you, making you lose 10 in every stat, takes up 10 days and takes 40 energy (you can do it at less than 40 energy and it will set you to 0). Hilariously enough, you can make your day count over 50 this way. Maya's game is actually pretty hard, especially if you're on a trackpad, but you get unlimited tries so you can keep trying until you get to 50 destroyed.
After you've trained enough, go to Gunther and he'll send you off on the mission to the floating city, but not before Siaren shows you her chest again. Head back to the landing site and click the teleporter, which requires 40 energy. Then you'll be sent to the
FLOATING CITY
There are two citizens here; talk to them (but before you do, know that you won't be able to go back once you talk to both). You'll learn some stuff about the relationship between the the floating city and FRY and then you'll be approached by a mysterious Yttsune citizen and he'll tell you some hints on how to find Da Winki. He'll leave and then you'll see two children being harassed by a vanguard. For some reason, you're able to convince the vanguard that you're their father and you take custody of them...only to be hit with a "to be continued" screen.
And that ends all of the material available on the Jungle Planet. Siaren has no H-scenes as of this update (unless you count the two times she shows you her chest).
Past Route [f]
[Final Stat Requirements for this route]
From Roselyn Route:
Strength: 20+
Knowledge: 40+
Charm: 20+
From Nebet Route:
Strength: 50+
Knowledge: 40+
Charm: 40+
This route is not as straightforward as the other two in the game, and has no ending as of now but it does have plenty of options. If you're here, know that this is Alison's route. Waking up on day 3, you get some shots of her straight out of the shower naked. You can start this route after babysitting Max's kids. Alison will appear in the ship's Library, so go there and talk to her and set her "Acquaintance" flag. Then select the question mark icon and she'll tell you to go visit three places on a planet. When you go to sleep the night that you set Alison's "Acquaintance" flag, you'll get an H-CG (just a pic) of Alison naked (no hooter nubs or naughty bits though).
At this point, you'll need to start either Roselyn's or Nebet's route and go on all three dates (no H-scenes need to be seen). You'll also have to have set Nebet's "Close Friend" flag if you choose to go to the desert planet for dates (remember to go to the Oasis too even if you already have the flag). It doesn't matter which you pick, but it does change where you'll go on Alison's dates. She has a stat check in one of her dates as well, but no H-scenes there.
MEDIEVAL PLANET
- Lake: Nothing of note
- Forest: Nothing of note
- Snowy Mountains: Nothing of note
DESERT PLANET
- Oasis: Nothing of note
- Canyon: Nothing of note
- Badlands: [50+ Strength needed]
After going on all three dates talk to Alison and her "Close Friend" flag is set. She'll leave to her room and unlock the storage room. There, you can open the closet and grab the shovels, but they do nothing as of this update. The object of interest is the red book on the bottom left. It's Alison's diary...but it's password protected. Thankfully, there's a password hint on the lock itself and a hint button you can use but you'll [need 40+ Knowledge]. The password hint is that the letters are capitalized strangely and there's a reason for that. If you take a look at the periodic table in the Library, you can see that each element has an atomic number as well as a symbol written in letters, with one capital and one or two lowercase letters. The capitalization corresponds to the password hint. The elements you'll need are:
- Ca: Calcium, Atomic No. 20
- Nd: Neodymium (not Nitrogen), Atomic No. 60
- Y: Yttrium, Atomic No. 39
- Ne: Neon, Atomic No. 10
Replacing the symbols with atomic numbers (don't count the space), you'll get the password 2060392010. Input that into the diary lock, and you'll get some emotional music and a shocking reveal. Because the information requires a lot of mental strength to read, you'll need 60 energy to read a chapter. The night that you read each chapter, you'll be taken to a door labyrinth. There will be a key behind one of the doors and a locked door. Opening the locked door nets you an H-scene. They're really easy, but. here're the paths to the H-scenes in case you really can't figure them out through trial and error:
- Chapter 1:
- For Key: Right Door, Only Door, Grab Key
- To Locked Door (From the Start): Left Door, Right Door, Locked Door
- Chapter 2:
- For Key: Left Door, Right Door, Grab Key
- To Locked Door (From the Start): Right Door, Only Door, Locked Door
- Chapter 3
- For Key: Right Door, Right Door, Right Door, Grab Key
- To Locked Door (From the Key Room): Left Door, Left Door, Left Door, Only Door, Left Door, Locked Door
- To Locked Door (From the Start): Right Door, Left Door, Only Door, Left Door, Locked Door
- Chapter 4:
- For Key: Right Door, Left Door, Grab Key
- To Locked Door (From the Start): Left Door, Left Door, Locked Door
After you read Chapter 5, Alison finds you and locks you in. The ship then starts rumbling and you hit your head, only to be presented with a "to be continued" screen.
Easter Eggs [g]
There are two easter eggs in this version and neither are route exclusive and can even be done when you're still on the common route. However, you'll need to be careful about the one on the desert planet if you're going to Nebet's route as setting her "Close Friend" flag (finding the underground source of water) will deny you access to the second easter egg.
Erin the Witch Apprentice [g1]
Go to the medieval planet's marketplace before Day 13 and talk to the girl in red. On Day 13, go back to the marketplace, and you'll find the girl in red is gone. In her place are two old ladies. Talk to them and they'll bring you to Widow Forest. They'll introduce you to their niece Erin (she was the girl in red) and have you help them prepare the potion they need. The puzzle itself is just determining what color the riddle is describing. They're easy to tell for the most part and you get unlimited tries, but here are the answers and explanations:
- Solution: Yellow, Green, Purple, Black, Red, Blue, White, Orange
- Capture and pour the solar scream: Yellow. The sun is depicted as yellow in many places in the world.
- Give me the luck of a hundred men: Green. The four-leaf clover is a sign of luck and is green.
- I will need the Mushrooms' juice of the Widow Forest: Purple. I don't understand; maybe it has something to do with poisonous mushrooms and poison being depicted as purple?
- The wicked and the evil shall walk toward me: Black. The color many people associate with evil is black.
- I will shine thanks to fire's essence: Red. Fires are usually shown as red flames.
- Take the peace of the sky and bring it to me: Blue. The sky is blue. In other news, water is wet.
- For the purity of the innocence was stolen: White. Purity and innocence is usually associated with the color white.
- And the dawn will join me: Orange. I think orange fits more with a sunset than a sunrise, but it still works.
And now you get your easter egg H-scene with Erin with two choices. After finishing, you'll start a new day fully energized. You can go back to the marketplace on any following day to talk with Erin and redo the puzzle to get to the H-scene again; you can even pick the other option you didn't pick the first time.
Ginny the Genie [g2]
Make sure that you have not set Nebet's "Close Friend" flag (you can check by clicking the green button on the blue box in the top left of the screen) and check the well near the landing site (on the left side of the screen) on the desert planet on or after day 20. You'll find a lamp and after rubbing it, a genie named Ginny appears. She'll grant you one wish. After all you saved her once, you get one favor. Now you'll get a choice between
- Getting a big cock
- Making E-millio wear something funny
- Having a threesome with Ginny and another cute girl
- Recovering all your memories
Choosing to recover all your memories does nothing but make you re-select. Choosing to get a big cock does not make your penis any bigger; she's a genie after all. Instead you'll get a big chicken in your room for the rest of the game. As an added bonus, the sleeping music is replaced with the sound of a rooster. Unfortunately, this also means you'll start every day off with 90 energy instead of 100 (only if you click the bed). Choosing to make E-Millio wear something funny is exactly what it says on the tin. E-Millio won't react at all because that's how Ginny's magic works. Choosing the threesome option gets you an H-scene with exactly that. You'll only be able to trigger Ginny's easter egg once, so use it wisely (on a big cock).
The Cheat Code [g3]
Go to your room, click on the floor and it will prompt you to type in something. Type in "myprecious" (without the quotes), and you'll find a bracelet/jewel in your inventory. Now you can experience both Nebet's and Roselyn's routes in one playthrough (and you won't even need to do the puzzle to get the thing in the first place).
Last Words [h]
This didn't take quite as long considering that I had my previous guide as a template. I got the easter egg information by looking around on Newgrounds and YouTube comments. If you find any errors, please contact me at fecalguides@gmail.com. Any questions can go into the comments section below.
I thank Taifun Riders for making this wonderful game that isn't just a mindless fapfest. It's a proper adult visual novel with an actual narrative, even if it doesn't seem so at first. I'm glad to see all of the changes that have been made to make Space Paws a more polished product. I also like the notes on some of the H-scenes that indicate that they will be in better quality in the future. Once again, I will ask that you support Taifun Riders on their Patreon so that we can head towards the completed product.
I also thank you for reading this guide. I hope that I explained everything clearly enough to be helpful. So, until my next guide I'm FecalMatter. Bye!